 |
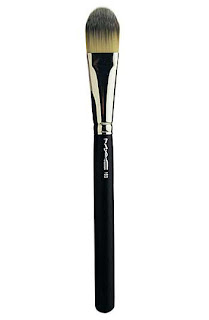
| Foundation Brush- MAC 190 |
FACE:
- FOUNDATION BRUSH
FOR: Used for liquid foundations.
HOW: Apply liquid foundation by wiping
the brush back and forth across the skin until
blended- almost as if painting.
 | ||
| Stippling Brush- Real Techniques |
- STIPPLING BRUSH
FOR: Buffing liquid, cream or mousse
foundations.
HOW: Buff liquid, cream or mousse
foundations onto face with small
circular strokes for natural look.
 |
| Beauty Blender |
- BLENDER
FOR: Blending
HOW: Pat and blend liquid, cream or mousse
foundation onto skin- also good
for concealers.
 |
| Kabuki- ELF |
- KABUKI BRUSH
FOR: Buffing powders
HOW: Buff on powder foundations,
blush or bronzer for a very smooth,
natural look.
 |
| Power Brush- SEPHORA #48 |
- POWDER BLUSH
FOR: Adding powders on top of foundation.
HOW: Sweep brush with powder over top of
foundation.
 |
| Blush Brush- NARS |
- BLUSH BRUSH
FOR: Blushes and bronzers
HOW: Apply blush or bronze color going
upward sweeping motion to the outer
edge of your cheek bone. Add a little
to your chin and forehead to create a
natural warm look to your face.
 |
| Fan Brush- Japonesque |
- FAN BRUSH
FOR: Applying highlight
HOW: Apply highlighting to the top area
of where you apply your blush, the
bridge of the nose, forehead, and
chin. This is to be applied very
lightly, not too much.
 | |||||
| Angled Cheek Brush- Well O' Well |
- ANGLED CHEEK BRUSH
FOR: Contouring
HOW: Usually a shade that is 2 times
darker then your skin tone. You
apply the shade to your hairline,
directly underneath your jaw line,
from the top of the ear to you middle
of your cheek and to slim nose, apply
on the sides.
EYES:
 |
| Eyeshadow Brush- Sonia Kashuk |
- EYESHADOW BRUSH
FOR: Eyelids
HOW: Apply eye shadow to the eyelid
stroking it little by little. Before
applying tap brush for access
powder to come off.
 |
| Crease Brush- Lancome |
- CREASE BRUSH
FOR: Adding eye shadow to the crease
of the eyelid.
HOW: Apply on crease back and forth
to create a well blended smokey
eye effect.
 |
| Blending Brush- MAC #224 |
- BLENDING BRUSH
FOR: Blends eye shadows together
HOW: Rubbing is side to side lightly
between two different eye shadow
colors. (Also good for crease).
 |
| Eyeliner- The Balm |
- EYELINER BRUSH
FOR: Liquid eye liner.
HOW: Apply it slowly along your
lash line stroke by stroke.
(Angled brush could be used to
fill in the eye brows).
 |
| Lipliner- Sacha |
- LIP BRUSH
FOR: Lip color or gloss
FOR: Apply color onto the lips with
small strokes.
CLEANING YOUR BRUSHES:
Now comes the important part; cleaning your brushes. Cleaning your brush is very important because you don't want to mix all of the products and leave it in there for a while because then you will have to buy new brushes almost every year. With time the brushes will start loosing it's function. Not cleaning will make your brushes rough and dry. Here is a simple way to clean your brushes at home.
- Gently run your make-up brushes under lukewarm water. Swish them around in the sink until the water runs clear. Hold the brush under the water with the handle pointing up so that you don't irreparably damage the brush.
- Add a small amount of mild shampoo or soap to the palm of your hard and swish your brush around in your hand and then under the water. Keep in mind that natural bristle brushes need gentler soaps.
- Rinse your hand and the brush thoroughly, then wring out the water from the brush's tip. To retain the shape of the brush hair, gently squeeze to remove all traces of soap and water and place them so they can dry flat on a clean dry towel.
For those who don't like to use shampoo or soap can buy a brush cleanser such as:
Hope you all enjoyed this post and if you have any question please feel free to email me at B-BellabyCamie@live.com or leave questions on comment box below. Always remember every Bella needs BEAUTY, Stay Beautiful!!!
Love Always,
Camila Barros
FOLLOW ME:
FACEBOOK: B-Bella By Camie
TWITTER: BBellabyCamie
INSTAGRAM: BBellabyCamie
GOOGLE+: BBellabyCamie@gmail.com
Love Always,
Camila Barros
FOLLOW ME:
FACEBOOK: B-Bella By Camie
TWITTER: BBellabyCamie
INSTAGRAM: BBellabyCamie
GOOGLE+: BBellabyCamie@gmail.com


No comments :
Post a Comment
Thank you for your comment!